
Monster Hunter Rise ya está disponible, lo que significa que es hora de cazar y dividir algunos monstruos. Al igual que los juegos anteriores de la serie, hay una gran cantidad de monstruos desafiantes contra los que luchar, cada uno con sus propios ataques y patrones únicos que debes comprender si esperas vencer con éxito a cualquiera de ellos. A continuación proporcionamos una lista completa de monstruos que detalla cómo derrotar a cada uno que puedes cazar en el juego base.
Tabla de contenidos [ ocultar ]
- Monstruos del juego principal (rango bajo)
- Cómo matar al gran Izuchi
- Cómo matar al Gran Baggi
- Cómo matar a Kulu-Ya-Ku
- Cómo matar al Gran Wroggi
- Cómo matar a Arzuros
- Cómo matar a Lagombi
- Cómo matar a Volvidon
- Cómo matar a Aknosom
- Cómo matar al Real Ludroth
- Cómo matar a Barroth
- Cómo matar a Khezu
- Cómo matar al tetranodón
- Cómo matar a Bishaten
- Cómo matar a Pukei-Pukei
- Cómo matar a Basarios
- Cómo matar a Somnacanth
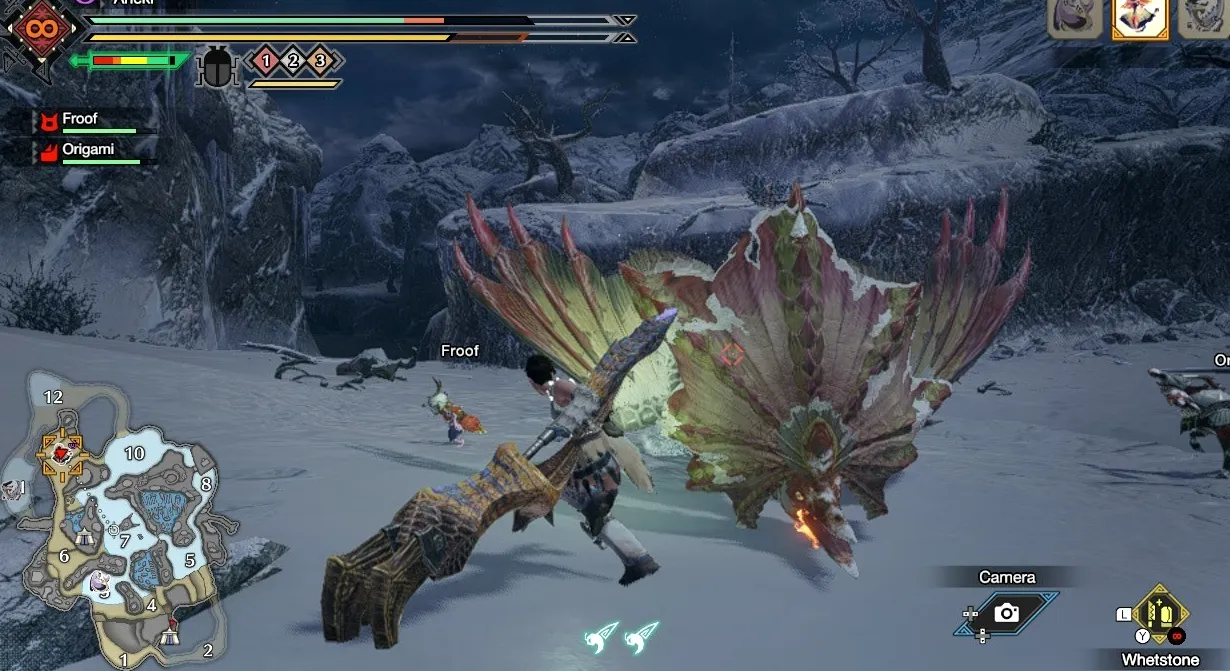
- Cómo matar a Rathian
- Cómo matar a Barioth
- Cómo matar a Tobi-Kadachi
- Cómo matar a Magnamalo
- Monstruos del final del juego (rango bajo)
- Cómo matar a Anjanath
- Cómo matar a Mizutsune
- Cómo matar a Almudrón
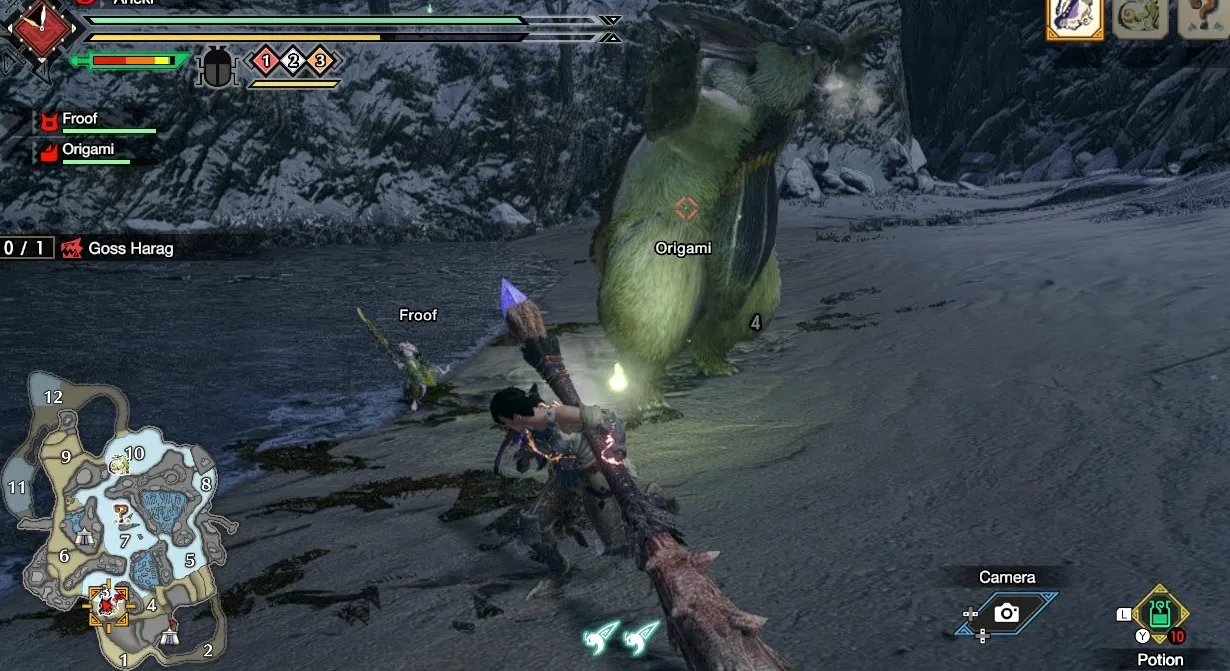
- Cómo matar a Goss Harag
- Cómo matar a Tigrex
- Cómo matar a Zinogre
- como matar diablos
- Cómo matar a Rathalos
- Cómo matar a Nargacuga
- Monstruos del final del juego (alto rango)
- Cómo matar a Rakna-Kadaki
- Cómo matar a Rajang
- Cómo matar a Jyuratodus
- Monstruos del ápice
Monstruos del juego principal (rango bajo)
En la sección principal del juego tendrás que luchar contra un total de 20 monstruos, que se clasifican como de rango bajo en la escala de dificultad de los monstruos. A continuación, detallamos las estrategias a considerar al derrotar a estas versiones de bajo rango, que aparecen en las misiones de Village y Hub con clasificación de 1 a 3 estrellas.
Cómo matar al gran Izuchi
- Puntos más vulnerables: cabeza, punta de la cola.
- Debilidades elementales: Iluminación (primaria), Agua (secundaria)
- Vulnerabilidades de estado: veneno, aturdimiento, parálisis, sueño, explosión, agotamiento, trueno
Great Izuchi is likely to be the first big monster you take on in your hunting endeavors. It’s one of the easier fights, but that doesn’t mean you shouldn’t be careful! Great Izuchi is a pack hunter and tends to fight with a posse of two smaller Izuchi to annoy you. It can also summon more buddies to join its side, though they go down pretty fast–so taking out Great Izuchi’s minions first is generally a good idea. Izuchi’s weak point is its head, but facing it head-on can be dangerous, especially when it’s enraged If it does get enraged, it uses a damaging ranged spit attack, and its swift triple-tail swipe, which can easily knock you flat on your back. Fortunately, many of its most damaging attacks use its tail and have a lengthy wind-up, making them easy to dodge or block. If you’re a rookie at Monster Hunter, hunting Great Izuchi’s a great way to learn many of the basic skills you’ll need to take on the game’s larger beasts, so use this opportunity to get some practice in.
[Jump to Top]
How to kill Great Baggi
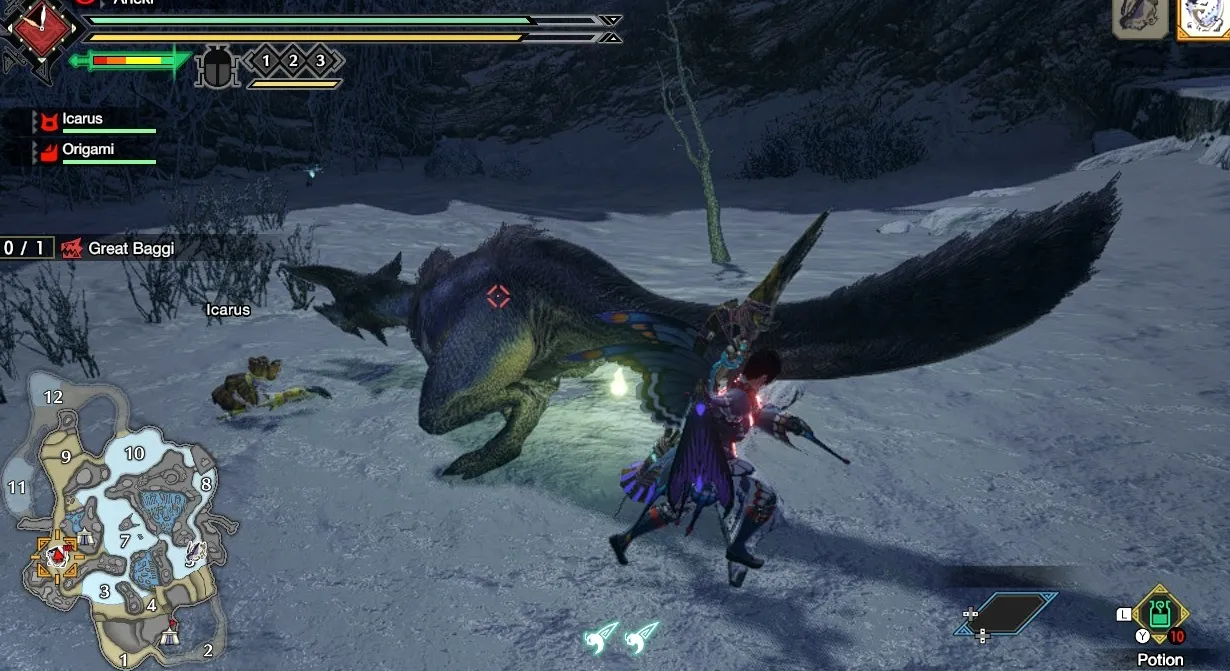
- Most vulnerable spots: Head
- Elemental weaknesses: Fire (primary), Water/Lightning (secondary)
- Status vulnerabilities: Paralysis, Blast, Exhaust, Fireblight
Did you manage to take down Great Izuchi? Swell! The other “Great” raptor-like large monsters fight in a similar fashion, so many of the skills you’ve picked up from Izuchi will come in handy. Much like Great Izuchi, Great Baggi is a pack hunter and will bring along a posse to its battles. Take out the small fry first (or let your buddies handle them) before focusing your attention on the boss. Great Baggi can also spit out projectile venom that will cause you to get drowsy, making your movements slow and rendering you incapable of doing much of anything. Chugging an Energy Drink item will help you recover from that sluggish state. Use the same combat strategies as Great Izuchi to dodge its physical attacks, and it shouldn’t be long before you’ve felled another “Great” one.
[Jump to Top]
How to kill Kulu-Ya-Ku
- Most vulnerable spots: Head, foreleg, tail
- Elemental weaknesses: Water (primary), all others (secondary)
- Status vulnerabilities: Stun, Blast, Waterblight
Kulu-Ya-Ku is smarter than the average birdbrain, despite its goofy appearance. In fact, it’s smart enough to dig in the ground for objects it can use for both defense and offense. Try not to hit the hard objects Kulu-Ya-Ku is holding, as doing so only results in your attacks getting deflected. Also, Kulu-Ya-Ku will eagerly try to smash your head in with jump attacks while holding these implements. If you can stagger or stun Kulu-Ya-Ku, it will drop whatever it’s holding. The objects tend to wear down after a while; attacking a held object that’s already showing signs of wear will cause it to break after a few strikes, stunning the big bird in the process. Beyond its crude tools, Kulu-Ya-Ku’s attacks are pretty simple, using mostly pecks and charges to hurt you. It’s weak to almost all elements, especially water, so bring your element-laced weaponry if you’ve got it to add some extra damage and show Kulu-Ya-Ku, who’s higher in the pecking order.
[Jump to Top]
How to kill Great Wroggi
- Most vulnerable spots: Head
- Elemental weaknesses: Ice (primary), Water (secondary)
- Status vulnerabilities: Paralysis, Sleep, Blast, Iceblight
It’s another “Great” bird wyvern that fights quite similarly to Great Izuchi and Great Baggi: fights in a pack, likes to attack up close. You know the deal by now, right? Where Great Wroggi differs most is in its status affliction of choice: when the purple sac expands, it’s about to spit up some noxious poison mist. Antidotes and Herbal Medicines will cure this, with the latter being slightly faster to take effect. Don’t wait too long to take your meds, though, because Poison’s life drain can really sting! Otherwise, stick to the same strategies as the other “Greats”: take out the small monsters first, watch its movements, dodge when you know it’s going to come at you, and strike while it’s vulnerable.
[Jump to Top]
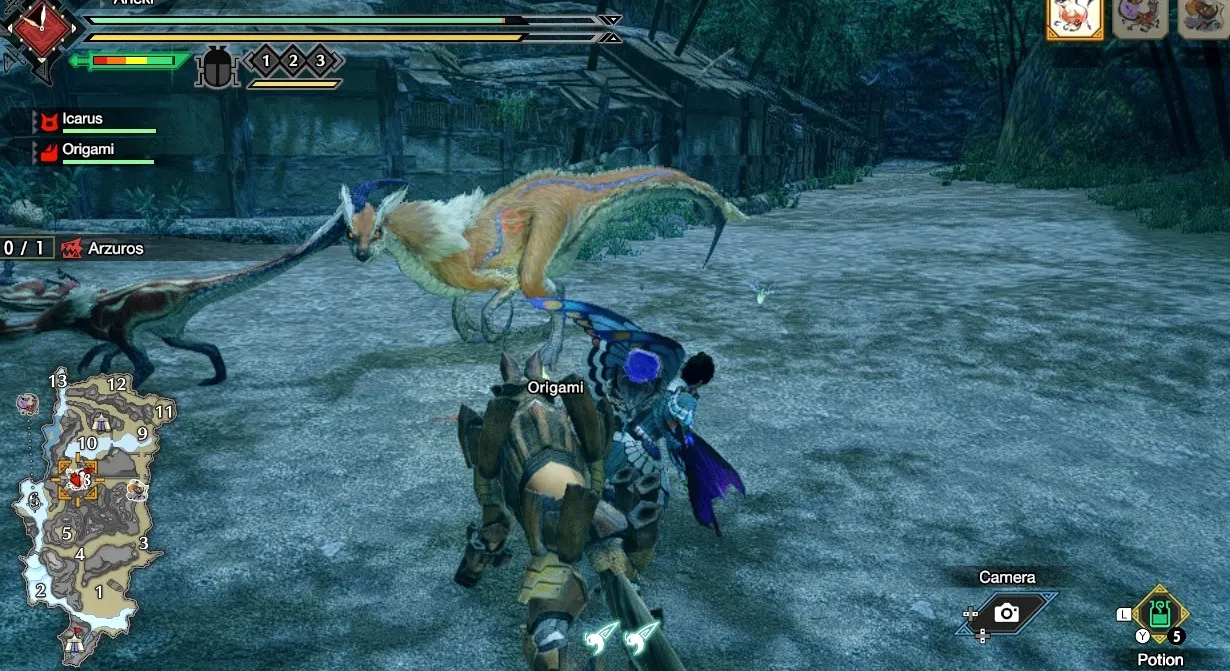
How to kill Arzuros
- Most vulnerable spots: Head, abdomen, rear
- Elemental weaknesses: Fire (primary), Ice/Lightning (secondary)
- Status vulnerabilities: Poison, Stun, Paralysis, Sleep, Blast, Exhaust, Fireblight
This big ursine might not look too bright, but if you’re not careful, it can cause some serious hurt, especially in areas with less space to maneuver. Arzuros’s most common attack sees it using three claw swipes to slash in front and around its sides. It’s not too hard to dodge, thankfully. While Arzuros’s charging attacks are more choreographed, avoiding them can be a bit tricky at times–especially because an angered Arzuros can turn around very quickly and charge right back at you just as you’re getting up on your feet again. It can also grab you in a literal bear hug, mauling you up close before tossing you aside. If this happens, use a wirebug to get right back on your feet. Even standing behind Arzuros isn’t completely safe: if it knows you’re attacking it from behind, it can fall back on its butt to knock you down and deal damage. Fortunately, because Azuros likes to charge at you, it’s easy to lure into traps–so set up your nets and hit it while it’s immobile.
[Jump to Top]
How to kill Lagombi
- Most vulnerable spots: Rear, head
- Elemental weaknesses: Fire (primary), Lightning (secondary)
- Status vulnerabilities: Poison, Stun, Paralysis, Blast, Fireblight
What has long ears, a big belly, and an appetite for destruction? It’s Lagombi, the winter hare from hell! Lagombi has the ability to cover long distances by sliding on its belly, which allows it to very quickly close the distance–and hurt you in the process. It can also do big bouncing butt-bombs, send a massive snowball hurtling your way, and throw chunks of snow up in the air to catch you leaping or climbing. When attacking, take care not to aim for its thick stomach, which can repel strikes easily and hasten the dulling of your blade. Instead, try to aim for its ears–you can break them for an additional item drop. Said ears are also very sensitive to sound, so Lagombi can be stunned easily with loud noises (such as from Sonic Bombs). Be aware, however, that an angered Lagombi won’t have that vulnerability. Also, its habit of sliding towards you makes it fairly easy to lure into ground-based traps. Good footwork and attacking the right spots should let you skin this hare without too many problems.
[Jump to Top]
How to kill Volvidon
- Most vulnerable spots: Head, upper body, parts of back
- Elemental weaknesses: Water (primary), Ice (secondary)
- Status vulnerabilities: Stun, Blast, Waterblight
Given Volvidon’s name, taste for warm habitats, and flame orange skin, you’d think that it’s a fire monster–but actually, Volvidon much prefers fighting dirty. Its mouth is filled with electrified spit that will jolt and paralyze you on contact, and it can let rip some noxious gas in a close radius that will render you unable to use any recovery items. Should you be unceremoniously farted on, use some deodorant to rid you of the stank with speed. Between its spit attacks, blazing-fast rolling spin-dashes, and long anteater tongue, Volvidon excels at attacking from a distance. The armored shell along most of its back can also deflect strikes from behind and above if your weapon isn’t at peak sharpness. As such, you’ll usually want to go for its head, limbs, and squishy belly, but getting in close can be tricky. Blinding it and luring it into traps can help you immobilize it for a short while to get some good damage in. Also, bring your water weaponry–Volvidon is very sensitive to moisture.
[Jump to Top]
How to kill Aknosom
- Most vulnerable spots: Head, Crest, Wing
- Elemental weaknesses: Water (Primary), Lightning (Secondary)
- Status vulnerabilities: Blast, Waterblight
A giant, fire-breathing kung fu crane? Yes! Aknosom is certainly one of the more unique encounters of Monster Hunter Rise., as this big bird has a lot of personality. Unfortunately, that personality is “an annoying jerk.” Aknosom is very swift, and can hop around the area easily. Generally, the worst place to be in relation to Aknosom is in front of it, as it can hit you with pecks from its sharp beak, headbutt using its big neck frill, perform a long-distance running dash and full-body tackle, or–worst of all– spit a series of fireballs that cover a wide range and distance in front of it. If you get hit by these fireballs, you’ll start taking fire damage that rapidly drains your life. The best way to get rid of these flames is what you learned in school: stop, drop, and roll! After several dodge-rolls, you should be back to normal–though your stamina bar will definitely be feeling it. (You can also use a Nulberry to recover from all of the elemental -blights.) When Aknosom hops up on one leg, be careful: it’s getting ready to do a close-range attack by slashing with its wing. This attack can hit in a semi-circular radius, so get away quickly! If you can manage to get Aknosom to fight you in a lake, it’ll help you out by squelching the flames. Smack it with some water- or lightning-infused strikes to do extra damage and put the bird to bed.
[Jump to Top]
How to kill Royal Ludroth
- Most vulnerable spots: Sponge mane, head, abdomen
- Elemental weaknesses: Fire (primary), Lightning (secondary)
- Status vulnerabilities: Blast, Fireblight
What’s underneath that big,moist ring of golden sponge around Royal Ludroth’s neck? Sadly, it’s not delicious cream filling, but rather a vicious lizard eager to get straight to your juicy center. Royal Ludroth is mostly a physical attacker, using its long body–particularly its tail–to strike. It thrives in wet environments, and can splash you with attacks that inflict Waterblight. Waterblight hampers your natural stamina recovery, so it’s good to get rid of it ASAP by using Nulberries. If you can get Royal Ludroth away from water, it’ll start to dry out, causing its attacks to lose some of their bite. If it gets too dry, it’ll start running away to look for a source of hydration, so keep pursuing it! Royal Ludroth’s back scales and tail have a good chance of deflecting strikes, so for maximum efficiency, aim for that smooshy golden sponge area–or the tail, which doesn’t take optimal damage but can be severed with cutting weapons to further limit the creature’s attack power. (Also: you can get an additional chance to carve for items on the severed tail piece!) Keep up a steady assault on Royal Ludroth’s vulnerable spots to hang it out to dry.
[Jump to Top]
How to kill Barroth
- Most vulnerable spots: Front legs, tail
- Elemental weaknesses: Fire (primary), Ice (secondary)
- Status vulnerabilities: Poison, Paralysis, Blast, Fireblight
Here comes the pain train! Barroth likes to attack with its massive noggin, using it to lunge and swipe at you. When you see steam coming off of that muffin top, watch out! Barroth’s going to start using some painful attacks, one of which is a very damaging tackle from a distance. Barroth loves to cover itself in mud when water’s nearby, and it can shake the globby piles off, throwing goop projectiles all around its body that severely slow you down if you’re caught in them. They disappear after a short time, but if you get stuck, try to roll out before they vanish–even a few seconds of limited mobility is enough time for Barroth to smack you with a devastating headbutt. Since Barroth’s head is its main weapon, it’s very resistant to your attacks and will deflect strikes regularly. Aim for its sides, limbs, and the base of its tail instead to do the most damage. The mud it rolls around in also doubles as an extra layer of armor, so knock that grime off with a few weapon strikes before really going in and mopping up.
[Jump to Top]
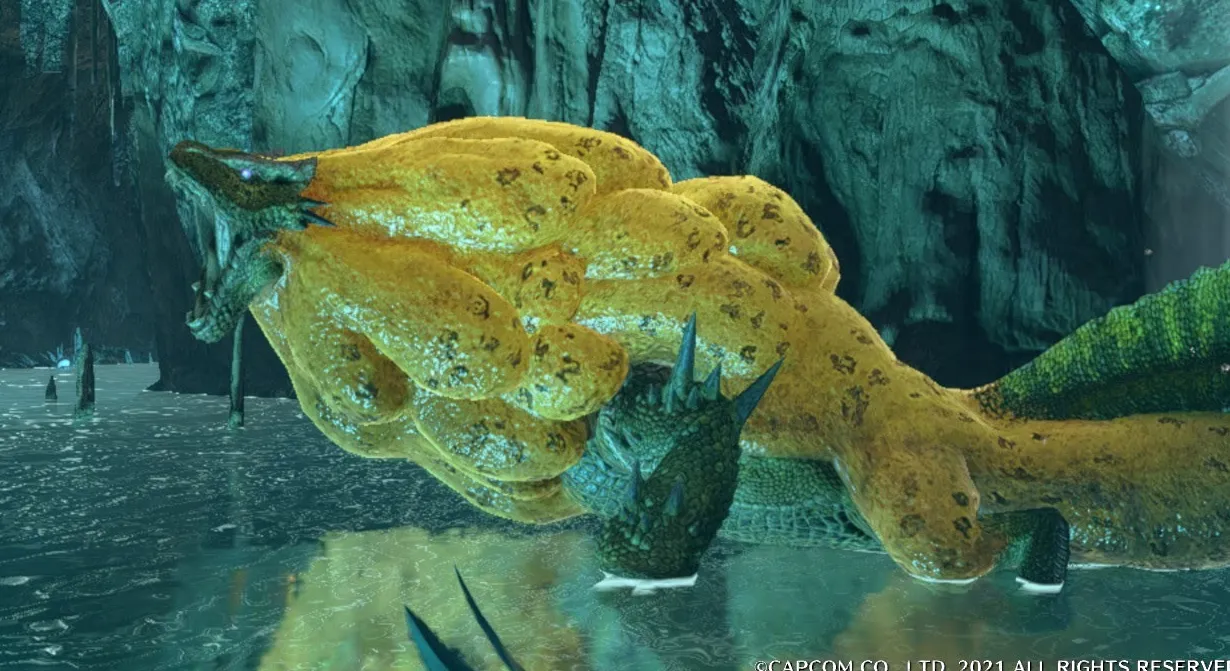
How to kill Khezu
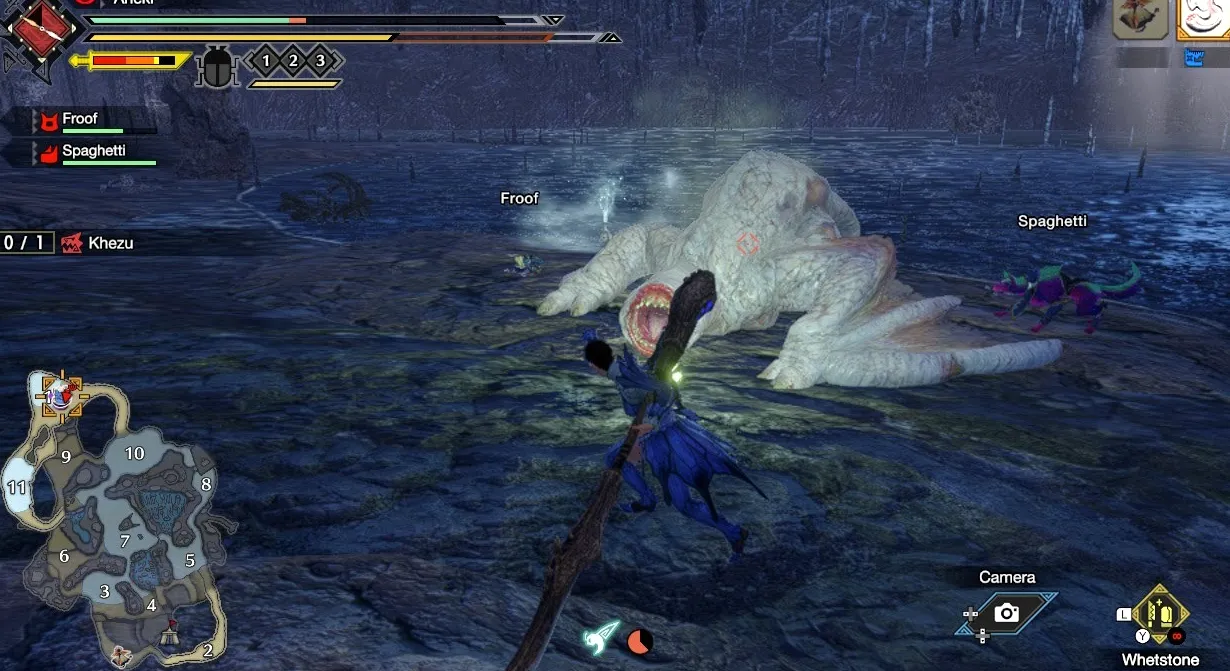
- Most vulnerable spots: Head, Neck
- Elemental weaknesses: Fire
- Status vulnerabilities: Poison, Blast, Fireblight
The moment you set eyes on this sightless, pallid freak of nature, you will want it extremely dead–but Khezu will do its best to make that as difficult as possible. Khezu relies heavily on electricity-based attacks, such as releasing an electric charge into the area around it and spitting out orbs of electricity. Bring your best electricity-resistant gear to the fight to help dull the damage–though taking too many shocks can still inflict Thunderblight, so keep Nullberries on hand. If you’re in a cave, Khezu becomes more dangerous, as it can cling to the walls and ceilings to launch lightning and pounce upon you. It’s possible to knock Khezu from its perch with projectile attacks and flying Wirebug-fueled strikes, which will leave it vulnerable for a few precious seconds. Try hitting it with fire- and poison-laced weaponry to make the fight go by faster, though do note that Khezu is fairly resistant to most other status ailments. When you see its pale white skin turn veiny and cracked, you’ve got it on the ropes.
[Jump to Top]
How to kill Tetranodon
- Most vulnerable spots: Head, neck, forelegs
- Elemental weaknesses: Lightning (primary), Fire (secondary)
- Status vulnerabilities: Paralysis, Blast, Thunderblight
A portly, seaweed-covered platypus might not seem too threatening at first glance, but Tetranodon is one of the tougher encounters from the early-game period. He seems rather simple at first, cannonball diving, charging at you, and striking out his webbed limbs. Eventually, Tetranodon will start vacuuming things into his gaping bill — and hopefully you’re not among them!
After he ingests his Big Gulp, he will stand on his hind legs. This is when you’ll really need to pay attention! Tetranodon’s sumo stomps send a shockwave of craggy rocks away from his feet, which have a surprisingly long and wide reach — instead of rolling, use Wirebug evading to safely escape. (You can attempt to knock him off-balance when he’s lifting a leg with repeated weapon strikes, which will leave him prone for a brief time, but this can be very risky.) He can also do a close-range hand clap, a long-range water spit, and even chuck a huge boulder in your direction. If Tetranodon gets super steamed, he’ll come barrelling at you with paws flying. Should you evade him successfully, you’re not out of the woods — he’ll make a quick turn and come roaring back at you, so watch out!. The scales on his back are tough and can deflect your weapon if it’s not at peak sharpness, so to inflict maximum damage, aim for his bill, his belly, and his front legs.
[Jump to Top]
How to kill Bishaten
- Most vulnerable spots: Head, Tail
- Elemental weaknesses: Ice (primary), Fire (secondary)
- Status vulnerabilities: Blast, Iceblight
There’s no need to monkey around with this trickster! Bishaten can be extremely annoying to fight, but there are some things you can do to put a speedy end to its shenanigans. Most of Bishaten’s attacks involve it either whipping its long, prehensile tail around or tossing fruit from you from a distance while balancing on said tail. The fruit it throws can cause status ailments like poison and stun, depending on what you get smacked by, so keep healing items (or a buddy with status-nullifying skills) with you to recover. Sometimes Bishaten will forgo the tossing altogether, opting instead to lunge at you from afar with a fruit held in its tail and releasing a noxious cloud of poison gas in a wide area. However, if you’re able to knock Bishaten off-balance while it’s sitting on its tail, it will drop its stash of fruit snacks, which you can pick up and use to turn the tables! Chow down on some healing fruit, or lob some poison or stun blasts to give Bishaten a taste of its own citrine medicine. You won’t get to keep these fruits after the quest, so you might as well use them now–or even save them for another monster you want to take down in the same area.
[Jump to Top]
How to kill Pukei-Pukei
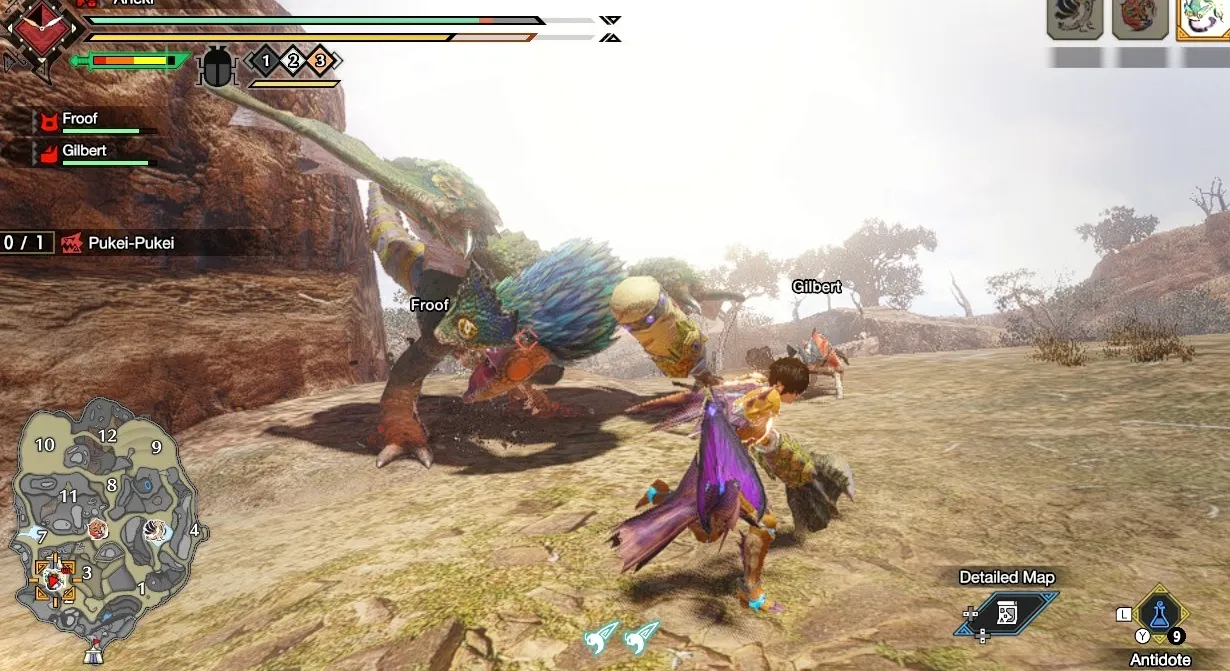
- Most vulnerable spots: Head, Tongue, Tail
- Elemental weaknesses: Lightning (primary), Ice (secondary)
- Status vulnerabilities: Paralysis, Sleep, Thunderblight
Slimy, slobbery, and poisonous to the touch, Pukei-Pukei is a very gross gecko who will make your life miserable. Pukei-Pukei is somewhat less dangerous when you’re fighting in close, but a big threat at a distance: its hovering dive-bomb attacks and long tongue-whip strikes can catch you even when you think you’re safe. The biggest danger when fighting Pukei-Pukei, however, is its poison. It can spew an intoxicating purple haze from its mouth…and also poop out poison globs from its tail. Ewww. Antidotes and herbal remedies–as well as poison-cleansing buddy skills–are a must if you plan on besting Pukei-Pukei.
Keep your eye on the color of the frill-feathers around its head as well as its face: when they start to turn orange and stand up, Pukei-Pukei is in an enraged state. Sometimes, Pukei-Pukei will dash off to snack on a nearby plant. This odd behavior is far from harmless: depending on what it eats, its poison secretions will gain additional effects, like lingering around for longer or causing stun. If the sac below its mouth is swollen, you’ll know that it’s just eaten something potentially very bad. Fortunately, Pukei-Pukei is weak to both paralysis and sleep, so use tools, weapons, and gathered endemic life to afflict and subdue it. It’s also possible to sever Pukei-Pukei’s tail with repeated slashing strikes–it will not, however, stop the tail poison attacks entirely, so be warned. Keep smacking its face while drinking antidotes, and Pukei-Pukei should give up the ghost.
[Jump to Top]
How to kill Basarios
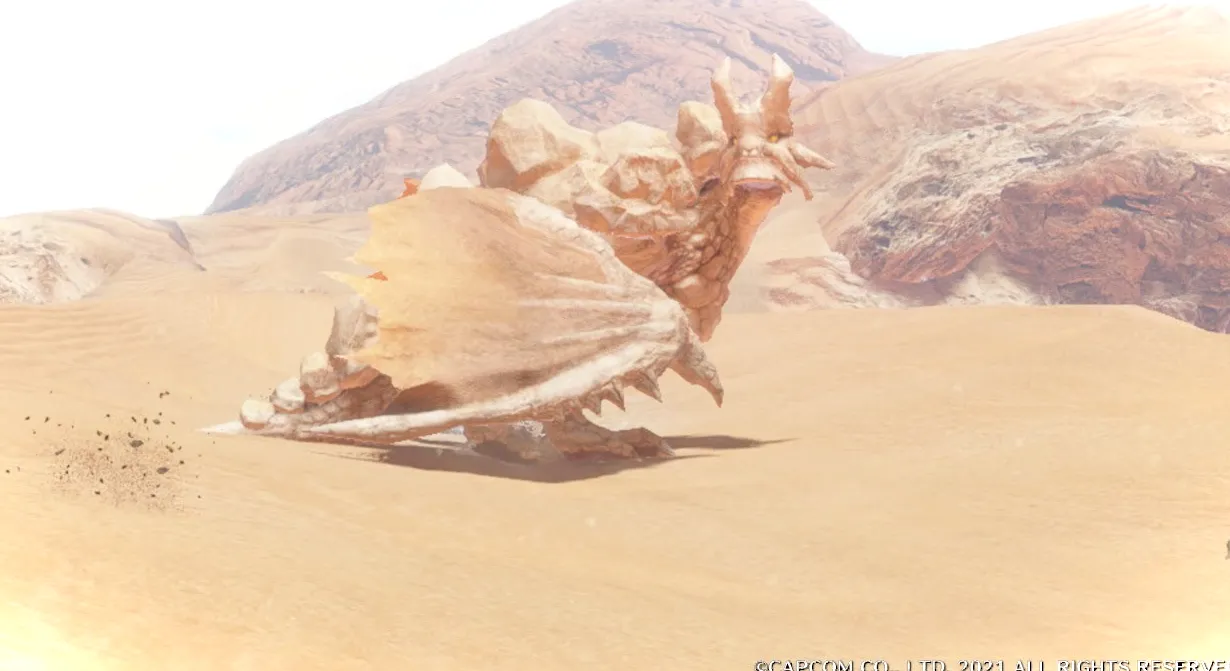
- Most vulnerable spots: Head, Abdomen, Legs
- Elemental weaknesses: Dragon (primary), Water (secondary)
- Status vulnerabilities: Sleep, Waterblight
Craggy and cranky: a dangerous combination. This cantankerous molten monster’s got a lot of armor on its back and head area, but its limbs and underbelly are significantly squishier. If you see Basarios rearing back or its belly glowing extra-bright, that’s your cue to get the hell out of Dodge. Stick around too long, and it’ll try to crush you with a rolling attack, spout several spurts of searing-hot gas around its body, spit out a few flaming fireballs from a distance, or blast you with an ultra-painful, blisteringly hot laser of fire aimed straight from its throat.
With so many fire attacks, bringing fire-resistant gear to the bout with Basarios is a no-brainer. Still, you should also consider hauling along a Palico with status-healing support skills (along with plenty of antidotes), as Basarios is also known to exhume very dangerous poisonous purple gas. Should you see purple mist forming around it, it’s time to move. It can also puff out some wisps of sleeping gas, as well, though this attack is less common. If you’re fighting this blockhead above ground, it can burrow under the dirt and give you chase–fortunately, it’s slow and easy to spot, so keep running, and you’ll stay out of danger. If a weakened Basarios limps off and tries to take a nap somewhere, it can camouflage itself as an unassuming pile of rocks. Fortunately, the R-stick target lock doesn’t lie, so use that to help find it–and maybe try to mine its back while it’s asleep for giggles.
[Jump to Top]
How to kill Somnacanth
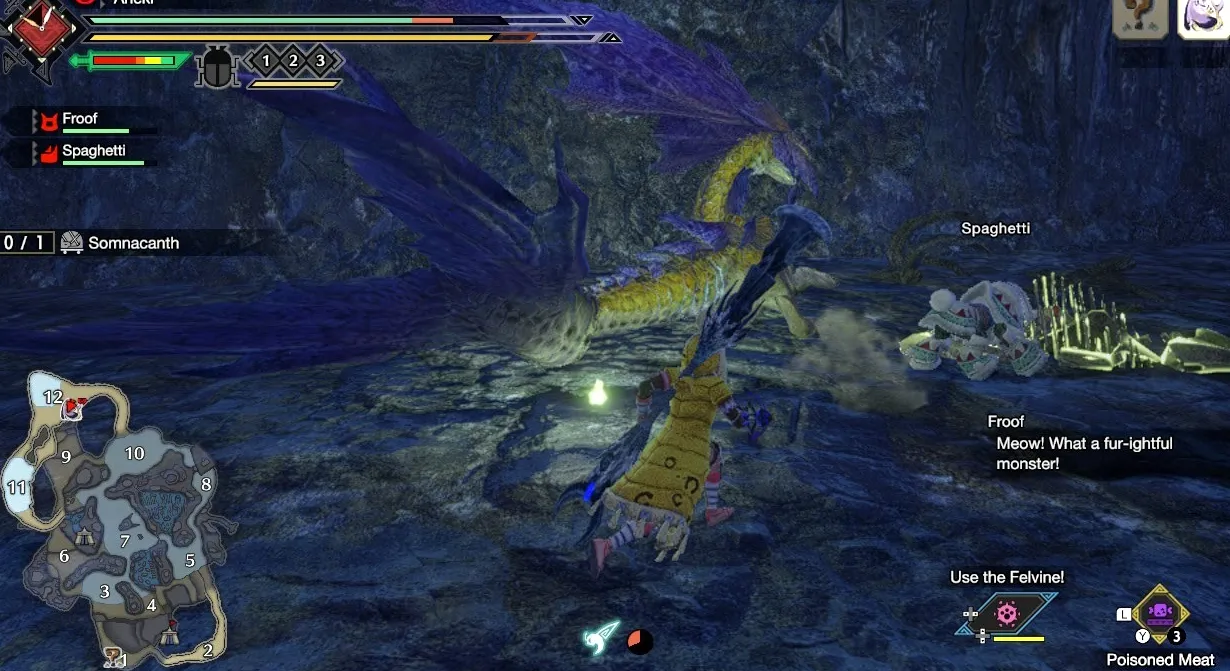
- Most vulnerable spots: Head, neck
- Elemental weaknesses: Lighting (primary), Fire (secondary)
- Status vulnerabilities: Blast, Thunderblight
Somnacanth is a fishy fiend that’s curiously enchanting, but trust us, this is a siren song you don’t want to get snared by! As you may have guessed by the name, Somnacanth’s gimmick is making you drowsy before going in for the kill. She can fire out sleeping gas from her maw like a rotating pulse cannon, but if she’s in the water, she can also exhume the gas in patterns as she swims around. Bring Energy Drinks to keep yourself juiced up and stave off the need to sleep. (Who says games aren’t realistic?)
When Somnacanth’s swimming, she can also dive for shells–and when Somnacanth cracks a shell open, bad things will happen! Keep an eye out for the glowing yellow shells in particular: when broken, a stunning flash will erupt in a wide radius in front of the beast, leaving you stunned and wide open. Fortunately, there’s an easy way to get an advantage. Since
Somnacanth is amphibious, she prefers to fight in watery areas. Finding a way to get Somnacanth on land–whether by trapping her, luring her, or just encountering her in a good location–will help immensely, as her movements and attacks are limited when away from the lakes. Bring your best lightning-element gear to the fight, and soon she’ll be the one taking a snooze.
[Jump to Top]
How to kill Rathian
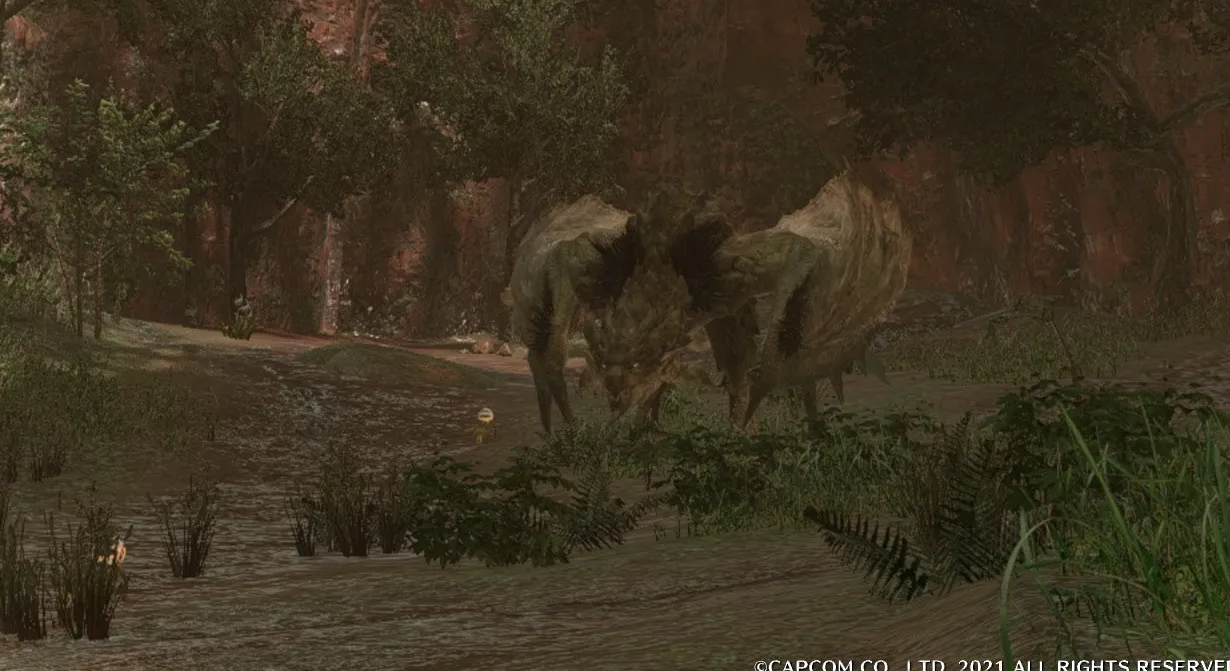
- Most vulnerable spots: Head, Wing, Tail
- Elemental weaknesses: Dragon (primary), Lightning (secondary)
- Status vulnerabilities: Thunderblight
The majestic queen of the land returns! Rathian has long been a Monster Hunter staple and a daunting challenge to overcome. With a massive wingspan, fiery breath, and a poison-laced tail, you’re in for quite the fight with this big girl! Rathian might not be the most agile of monsters, but her huge wings afford he
Publicaciones Relacionadas:
- Misiones de Fortnite Sledgehammer: cómo derrotar al Boss Cube Monster, encontrar piezas de Cube Monster (1)
- Guía de reliquias de Riders Republic: cómo obtener todos los deportes secretos (1)
- Cómo desbloquear la hoz y el martillo en CoD: Black Ops Cold War y Warzone (1)
- Casas de jugadores de Forza Horizon 5: todas las ubicaciones, precios y ventajas (1)