
Gjallarhorn es una de las armas con más historia de la franquicia Destiny , y su regreso a Destiny 2 ha llegado con cierta fanfarria: tendrás que completar la nueva mazmorra, Grasp of Avarice, como parte de la nueva celebración del 30 aniversario de Bungie. Contenido descargable. Sin embargo, vale la pena hacerlo porque Gjallarhorn es tan poderoso como lo recordarán los Guardianes de Destiny 1. Y una vez que tengas el lanzacohetes exótico (usa nuestra guía de Gjallarhorn si quieres saber cómo engancharlo), querrás desbloquear su catalizador exótico para aumentar aún más su poder.
Para encontrar el catalizador, deberás hacer algunas cosas específicas en la mazmorra Grasp of Avarice. La buena noticia es que puedes completar estos pasos en cualquier dificultad de mazmorra, lo que hace que el catalizador sea bastante fácil de conseguir si sabes lo que estás buscando. Aquí encontrará todo lo que necesita hacer para ganar el catalizador exótico Gjallarhorn.
¡La charla ha comenzado!Únete al chat
Reproduciendo ahora: Transmisión en vivo del paquete del 30.° aniversario de Destiny 2 Bungie
Tres cofres en manos de la avaricia
Como muchos otros catalizadores exóticos para armas especiales como Gjallarhorn, tendrás que resolver algunos acertijos dentro de la mazmorra Grasp of Avarice para poder obtener este catalizador. Sin embargo, este es un proceso mucho más fácil que con armas como Vex Mythoclast o Whisper of the Worm. En Grasp of Avarice, debes buscar tres cofres del tesoro especiales, que tendrás que desbloquear luchando contra tres enemigos específicos.
Esos enemigos son poderosos Vándalos Caídos, conocidos como Reaver Vandals . Cada uno de estos enemigos de nivel élite (lo que significa que tienen una barra de salud amarilla) empuña un Scorch Cannon y aparece cerca del cofre que estás intentando abrir. La buena noticia es que no necesitas matar a estos Reaver Vandals para conseguir lo que quieres. De hecho, es mejor dejarlos con vida. Cuando atacas y dañas a un Reaver Vandal, dejará caer un engrama amarillo como los que usas para ingresar por primera vez a la Cueva del botín al comienzo de Grasp of Avarice. Recoge un engrama y obtendrás la desventaja Cargado por riquezas. Luego tendrás 30 segundos para abrir el cofre del tesoro correspondiente antes de que se acabe el tiempo de la desventaja. Si llega a cero, morirás, así que asegúrate de saber dónde vas a alcanzar el cofre y de poder llegar allí rápidamente antes de recoger cualquier engrama.
Si estás haciendo Grasp of Avarice con tres jugadores (la forma más fácil), ten en cuenta que cada uno de tus compañeros de equipo deberá abrir cada cofre; Un jugador que abre un cofre no cuenta para todo el equipo.
Una vez que hayas desbloqueado los tres cofres, obtendrás el catalizador Gjallarhorn, lo que significa que no necesitas completar Grasp of Avarice para ganarlo. Actualmente, la mazmorra tiene errores, por lo que solo puedes obtener su armadura y arma una vez por personaje, por lo que si no tienes alternativas para ejecutarla, es posible que quieras salir después de agarrar el catalizador pero antes de enfrentarte al jefe final. .
Aquí es donde puedes encontrar cada uno de los cofres en Grasp of Avarice y su correspondiente Reaver Vandal, y cómo desbloquearlos todos.
Cofre No. 1: La cueva del botín
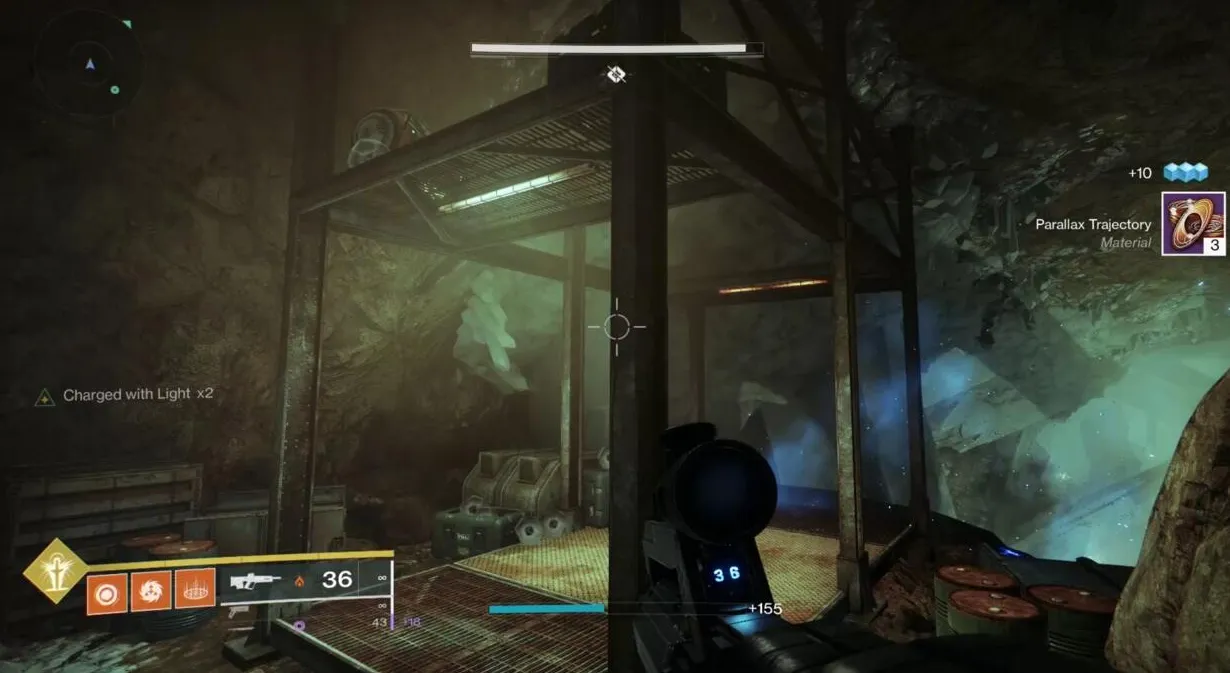
El primer cofre es el más fácil de encontrar. Cuando ingresas a la Cueva del botín dejándote caer por el agujero que se abre en el primer cristal que encuentras, llegarás a una gran caverna llena de enemigos. Estarás en el lado izquierdo de la habitación con algunas vigas encima; adelante habrá algunos enemigos de la Colmena, y al otro lado del agua de ellos (y de ti) estarán el Reaver Vandal y un par de guardaespaldas de Dreg con barras naranjas.
Primero, mira hacia arriba por donde entras por primera vez a la habitación, donde están las vigas de acero oxidadas. Puedes cruzar por debajo de esta estructura para avanzar, pero justo encima habrá otra plataforma con el cofre.
Entonces, tu objetivo aquí es atacar al Reaver Vandal, agarrar un engrama, luego saltar hacia atrás a través del espacio y abrir el cofre. Es un proceso bastante simple y, como se mencionó, no es necesario matar por completo al vándalo para que suelte engramas. Una forma útil de solucionar esto es llevar a tu equipo al Vandal cuando hayas eliminado a los otros enemigos y atacarlo con espadas para causar daño rápido. Toma tus engramas y regresa al cofre para obtener el primer tercio del catalizador. Sabrás que funcionó si recibes un mensaje en la esquina izquierda de la pantalla que dice “Recuperaste fragmentos saqueados”.
Chest No. 2: The Stairs Deathtrap
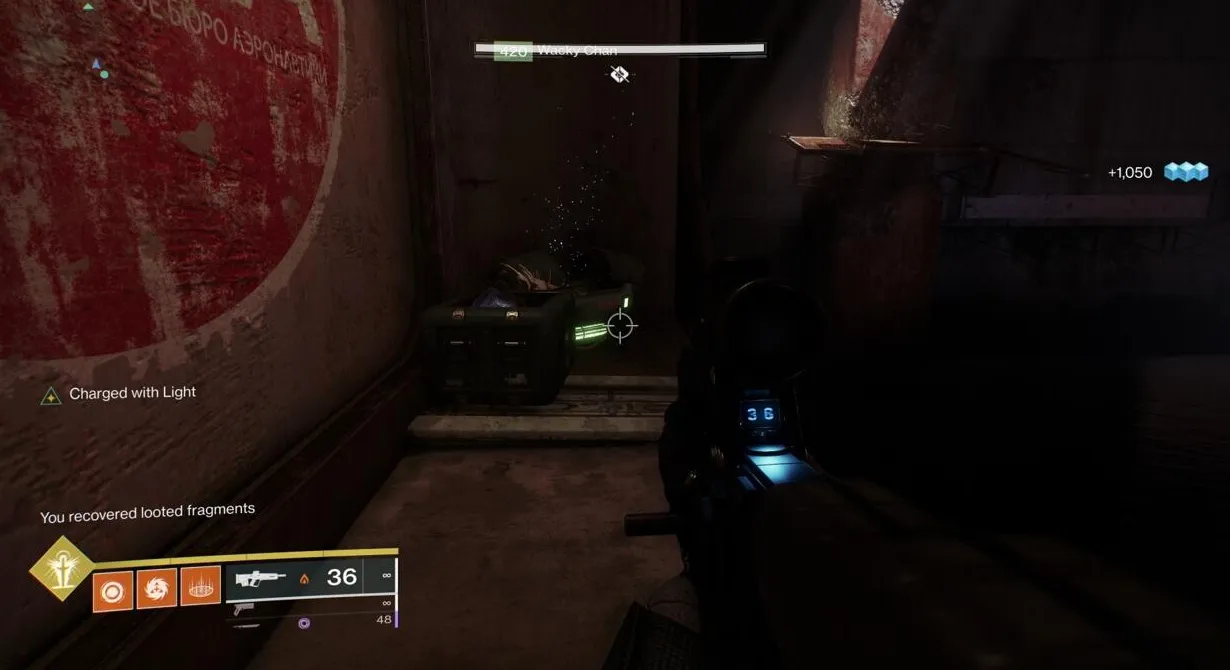
As you advance through the first portion of the dungeon, you’ll eventually hit a cylindrical room with four closed rolling steel doors. Here, the game teaches you about the Scorch Cannon mechanic used throughout the rest of the dungeon. After you open and unlock all four doors, you’ll be able to leave the room up a flight of stairs. You’ll likely remember getting crushed by a giant steamroller-type barrel your first time through this area.
Dodge the barrel (or get squashed by it) then ascend the stairs to the top, where you’ll enter a large room that looks like a flooded, ruined garage. The Reaver Vandal is waiting for you here, and you can’t miss him–in fact, you’ll probably need to run past him to continue. To leave this room, climb some boxes to enter an open vent overhead.
Attack the Vandal and grab your engram, then enter the vent above. Follow it to its end, where you’ll drop into another flooded room, near a collapsed column with a catwalk surrounding it. Turn to your right and face the back wall of this area, where you should see a depression that you can jump to. Your second treasure chest is here, as well as your second helping of “looted fragments.”
Chest No. 3: The Sunken Lair

You won’t get to the last chest until just before the dungeon’s final boss. After the sparrow portion of Grasp of Avarice, you’ll enter a(nother) big underground cave, this one with some waterfalls and several Fallen outposts. In the center is a big round structure, and each outpost has launchers to send you flying from one to the other.
You can’t find the chest in this room, or the Reaver Vandal to open it, until you’ve destroyed the Fallen Shield and completed the encounter. If you’ve been through here once, you know what you need to do to kill the Servitors and destroy the shield generators above you.
With that out of the way, you’re free to hunt down both the chest and the Reaver Vandal to open it. This is the only one of the chests that’s actually kind of hard to open, and that 30-second timer is going to be a problem. You’ll want to make sure you’re fully prepared to get back to the chest before you pick up an engram, and it’s easiest to do this with another player or two who can help out, with each of you dealing with it one at a time.
First, the chest: It’s on the central island, on top of the building in the middle of it. You can climb up on top to find the chest next to some open boxes of blank engrams. Pay attention to where you’re headed, because you’re going to need to get to this chest as fast as you can.
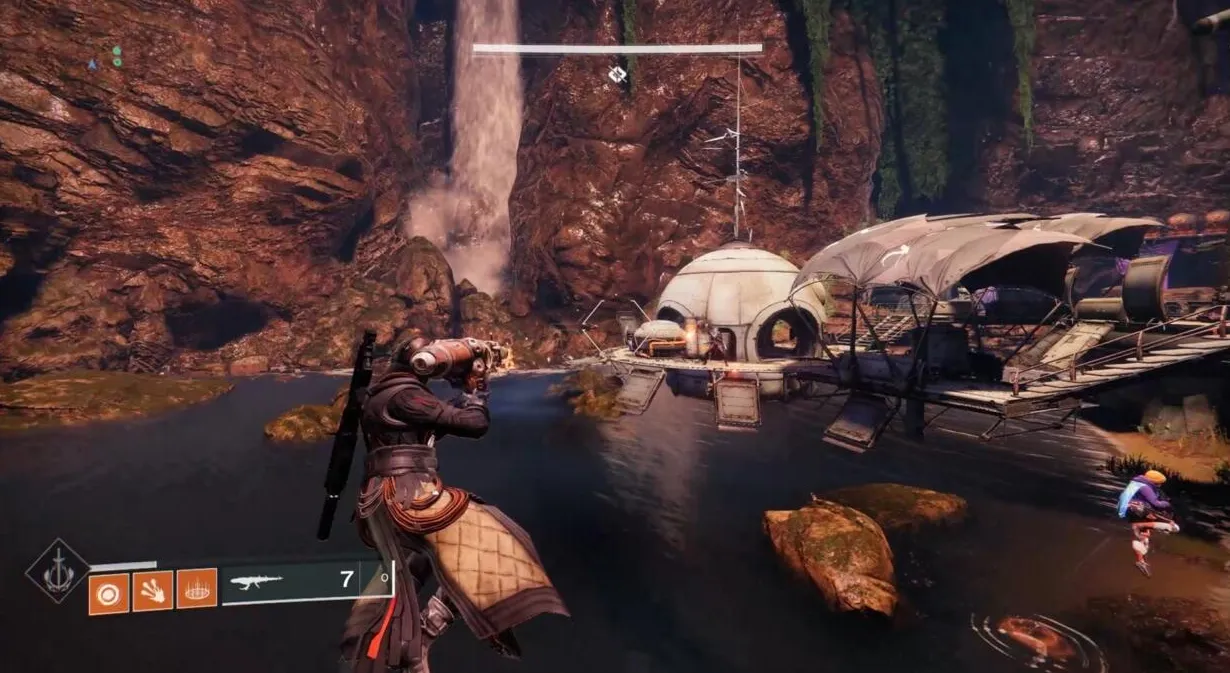
Next, the Reaver Vandal: He’s in the outpost in the back corner of the cave, up and to the right of the central island if your back is to where you entered this cave. To get there, you can use the launcher on the central island to shoot yourself. It’s the cliffs with the waterfalls. Look for the Vandal on the bridge leading to the building closest to the back wall of the cave, surrounded by water.
To get back to the chest, align the launcher found at this outpost to shoot you to the central island. If you can use something like Titan’s Thundercrash or top-tree Dawnblade as a Warlock to get yourself there faster, that’s a good idea. But for Hunters in particular, you’re going to need to launch yourself and climb the building as fast as possible.
The best way my team found to do this was to leave one person near the launcher with a Scorch Cannon, while the person opening the chest went to collect their engram. That way, the Scorch-wielder could launch the engram-runner as soon as they were ready. That helped shave off a second or two–launching yourself is kind of a pain–but expect to be down to the wire getting back to that central island.
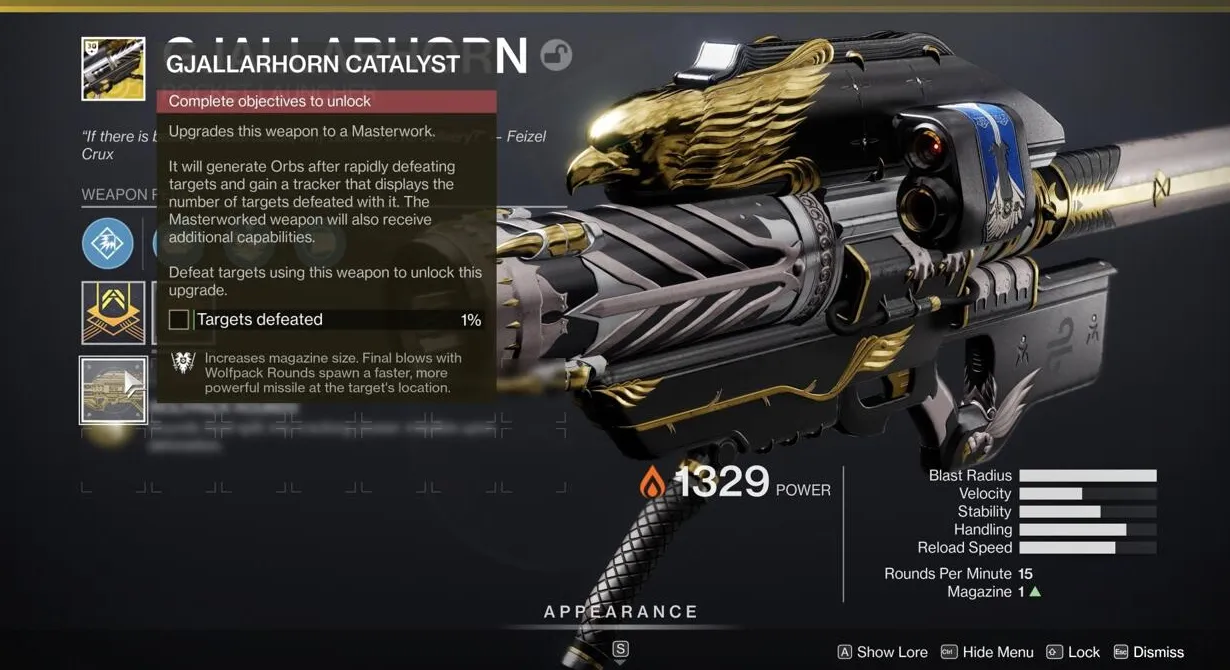
Open that third chest and you’ll finally assemble the Gjallarhorn catalyst. You’ll now need to rack up a whole bunch of kills with the launcher in order to finally unlock the benefits of the catalyst. Expect to earn 400 rocket launcher kills, but the benefits of doing so, including Orbs of Power generation, the mega missile generated by scoring kills, and faster reload, should help to make Gjallarhorn one of the most reliable damage-dealing weapons in the game–great for boss fights.
There’s a whole lot going on in Destiny 2 right now as part of the 30th Anniversary DLC. Check out our guides on how to get Halo weapons in Destiny 2 and how to unlock the Forerunner Exotic sidearm (which is a version of Halo’s pistol). Destiny 2 also got a massive patch with Update 3.4.0.
Publicaciones Relacionadas:
- Misiones de Fortnite Sledgehammer: cómo derrotar al Boss Cube Monster, encontrar piezas de Cube Monster (1)
- Guía de reliquias de Riders Republic: cómo obtener todos los deportes secretos (1)
- Cómo desbloquear la hoz y el martillo en CoD: Black Ops Cold War y Warzone (1)
- Casas de jugadores de Forza Horizon 5: todas las ubicaciones, precios y ventajas (1)